Style systems guide
Kibbe Body Type Test: Step-by-Step Self-Assessment Guide
A Kibbe body type test is best treated as a guided style exercise, not a score that names your identity from a few measurements. Start with a level, full-length photo; observe your overall vertical line, bone structure and softer contours; then compare how complete outfits follow those lines. David Kibbe calls the result an Image Identity. His updated guide, David Kibbe’s Power of Style, presents style as an individual exploration rather than a list of flaws to correct.
This page gives you a repeatable way to observe your silhouette and test clothing. For the families and current identity names, use our Kibbe body types overview. If your question is about bust, waist and hip ratios, the body-shapes guide covers that separate system.
Setting Up Your Photo for an Honest Evaluation
Set your camera on a stable surface or tripod around chest to mid-torso height. Stand in a relaxed, neutral position, with your full figure in frame and the camera held level. If your room allows, step about 8 to 10 feet from the lens and use a timer. Wear simple, reasonably close-fitting clothes so you can see the outline of your shoulders, torso and legs without a bulky outer layer changing it. You do not need to share the photo.
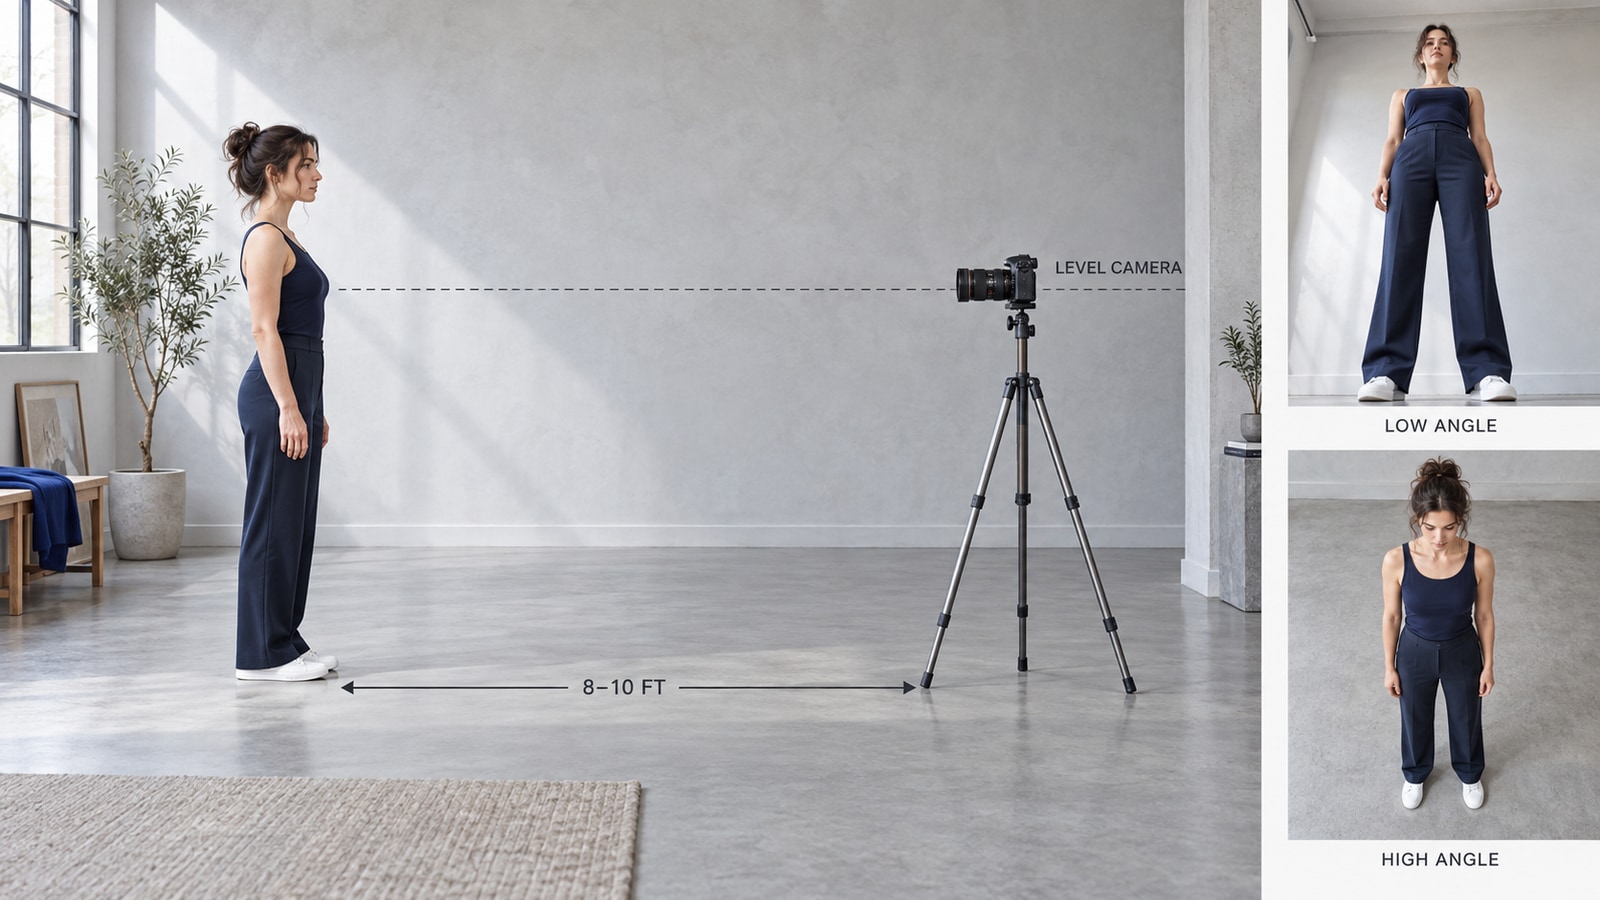
The distance is a practical starting point, not a Kibbe rule or a magic number. A phone held very close or tilted sharply upward can make the nearer part of a body look larger; a high angle changes the impression in the opposite direction. The photography principle is the same one behind Nikon’s advice on avoiding wide-angle portrait distortion. If you cannot step back that far, keep the camera level, use the least distorting framing available, and compare outfits under the same setup. A photo is one observation, not a definitive classification.
The 3 Core Diagnostic Questions
Rather than tallying isolated features, ask what your whole silhouette and clothing seem to need. In Kibbe discussions these recurring line needs are often called accommodations: the garment leaves room for a quality such as length, width or curve instead of fighting it. Use the questions below as prompts for trying outfits, not as a three-answer formula.
1. Do you notice vertical?
Look at your head-to-toe outline and then at an outfit with a continuous line, such as a long layer or similar colors from top to bottom. Does that uninterrupted length seem coherent on you? Vertical line means the visual impression of length; it is not a tape-measure reading or a claim about your actual height. Compare the effect with an outfit that breaks the line at several points.
2. Do you notice width or petite?
Observe the bone structure and the space clothing needs across your upper body. Does a more open neckline or less confined shoulder area sit naturally, or do compact, deliberately scaled details seem more at home? In this vocabulary, width and petite describe different visual needs; neither is a judgment about body size. Do not decide from one shoulder measurement, a close-up photo or a single garment that simply fits poorly.
3. Do you notice curve?
Consider the path of a garment over your outline and the softness of body tissue, sometimes called flesh in older Kibbe descriptions. Does a cut that allows for rounded contours sit more naturally than a straight cut that pulls or hides them? Test with clothing that fits in both cases. If an item is too small, its strain says more about that item’s fit than about your Image Identity.
Write down which outfit effects repeat. Length, openness, compact scale and curve can interact, and the three questions do not produce an automatic identity code. Kibbe’s current book offers a broader set of guided exercises; this short self-check is a way to begin observing, not a substitute for his full method.
Interpreting Your Results Without Rigid Point Counting
Old A–B–C–D quizzes invite you to add up answers about individual bones or facial features and declare a type. A mixed set of answers is normal when you look at separate details. Instead, return to the whole impression: compare two or three complete outfits in the same light and from the same camera position. Note which lines repeat what you see in your silhouette and which details distract you. Your preference matters as much as the label.
For example, if a long unbroken layer feels easy and a heavily segmented outfit feels busy, record that outfit observation. It may suggest a useful direction to test again; it cannot establish an Image Identity by itself. Likewise, needing room at a shoulder seam might point to a garment-sizing problem. Try another cut before treating it as evidence about accommodation.
Use the ten Image Identities and five families to narrow your next reading, then consult Kibbe’s own updated book if you want to follow his current exercises. Our measurement-based body-shape calculator answers a different question and does not assign a Kibbe ID. You can stop at a useful clothing observation without settling on a final type.